> ## Documentation Index
> Fetch the complete documentation index at: https://docs.paysight.io/llms.txt
> Use this file to discover all available pages before exploring further.
# Card Submission API Quickstart
> Learn how to integrate with the Paysight Card Submission API for processing payments and customer information
This guide covers the core card submission endpoint that allows you to process payments by submitting card and customer information for a specific product.
Please also consult the API Reference for detailed information on the [Card Submission API](https://docs.paysight.io/api-reference/card/submit-card-and-customer-info-for-a-product).
## Prerequisites
Before starting the integration, ensure you have:
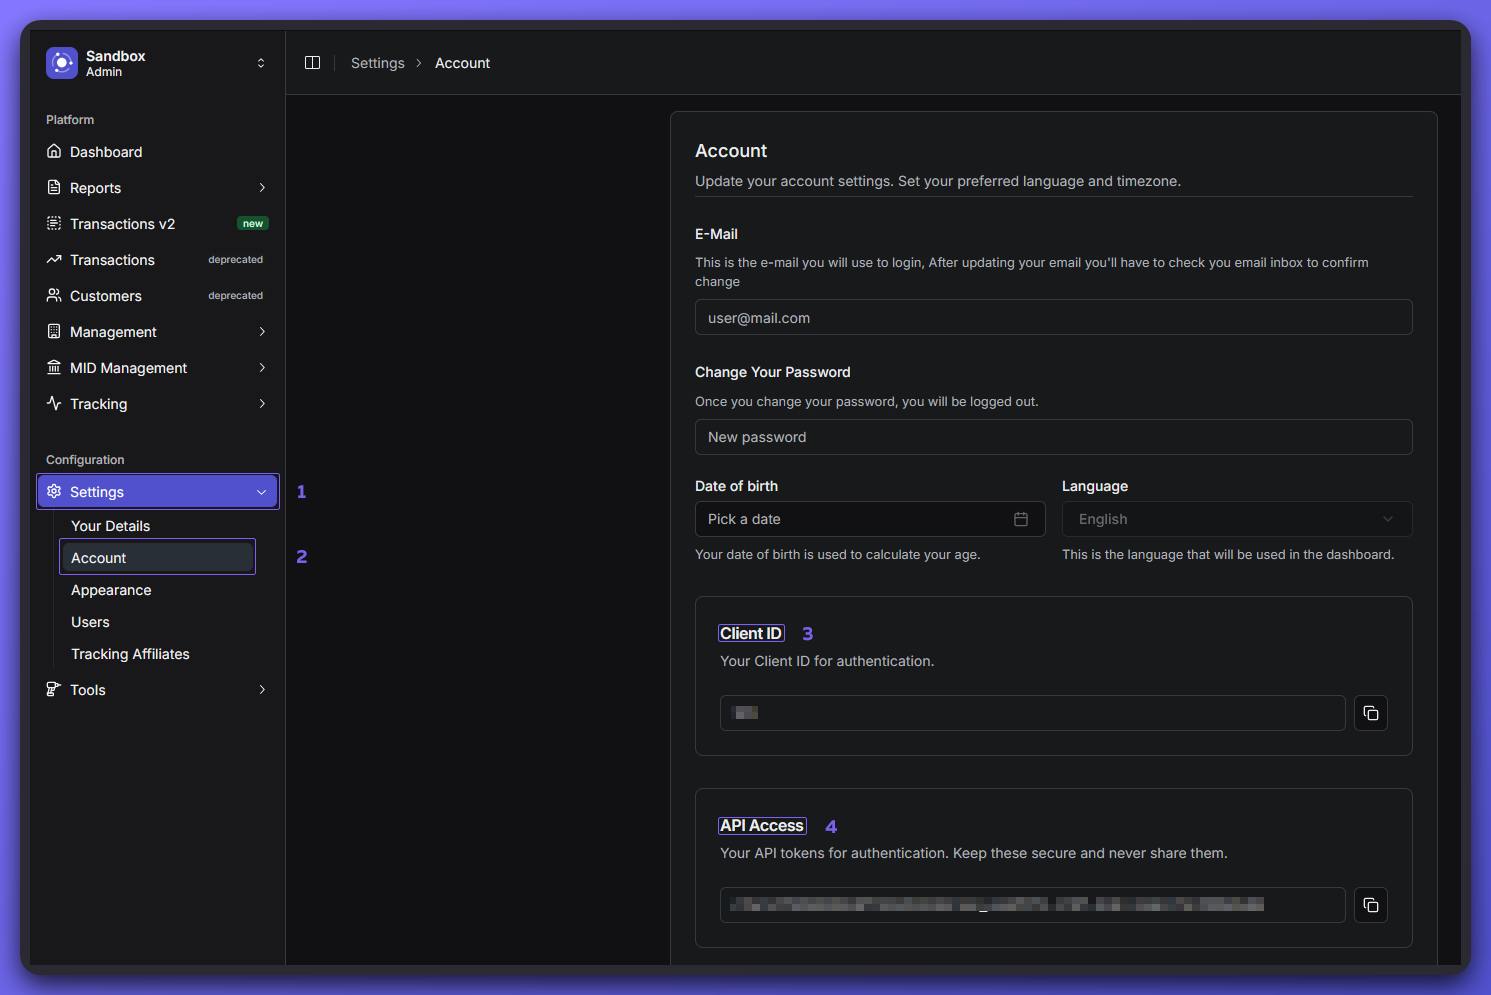
Active merchant account with Paysight
Find this in your Account Section
API key available in your Account Section
Available from your Product Management section.
Set up for testing
 Always use the test environment `(test.paysight.io)` during development and testing phases.
## API Endpoint Overview
The card submission API processes payment transactions by accepting card details and customer information.
### Base URL
* **Test Environment**: `https://test.paysight.io`
### Endpoint
* **Method**: `POST`
* **Path**: `/api/{productId}`
## Step-by-Step Integration
### Step 1: Authentication Setup
The API uses [API key](https://app.paysight.io/settings/account) authentication passed in the Authorization header.
```bash theme={null}
'Authorization': 'your-api-key-here',
'ClientId': 'your-client-id',
'UserEmail': 'your-paysight-account-email',
'Content-Type': 'application/json'
```
### Step 2: Prepare Request Payload
The API expects a comprehensive payload with card, customer, and transaction details.
#### Minimum Required Request Body (JSON)
```json theme={null}
{
"paysightSession": null, // required if partnerSession is null
"partnerSession": "abcdefg12345", // required if paysightSession is null
"card": {
"name": "John Smith",
"pan": "4111111111111111",
"expiryMonth": 12,
"expiryYear": 2029,
"cvv": "333"
},
"email": "johnsmith@gmail.com",
"amount": 1.00
}
```
#### Session Management
| Parameter | Type | Description |
| :------------------ | :----- | :------------------------------------------------------------------------------------------------------------------------------- |
| **paysightSession** | string | Unique identifier of the session/user visit (generated by Paysight). |
| **partnerSession** | string | Partner/client assigned unique identifier of the session/user visit. Persist this value between calls for the same user session. |
#### Using session fields to match transaction webhooks
Use these two fields as your correlation keys across API calls and webhook events:
* Send your own click/visit/session identifier in `partnerSession` when calling Card Submit.
* Card Submit responses return both `partnerSession` and `paysightSession`.
* Transaction webhooks include both fields, so you can join webhook events back to your original traffic/session data.
* If you use the Widget SDK, `sessionId` is forwarded to Card Submit as `partnerSession`.
### Step 3: Make a Request to API
### Base URL
* **Test Environment**: `https://test.paysight.io`
### Endpoint
* **Method**: `POST`
* **Path**: `/api/{productId}`
### Step 4: Handle the Response
The API returns a comprehensive response with transaction details:
```json theme={null}
{
"paysightSession": "",
"partnerSession": "",
"subscribeSuccess": true,
"chargeSuccess": true,
"info": "",
"error": "",
"email": "",
"message": "",
"orderId": 123,
"descriptor": "",
"mid": "",
"threeDSecureId": "",
"transactionId": "",
"amount": 1.00
}
```
If chargeSuccess is false but subscribeSuccess is true, this indicates a successful opt-in.
### Step 5: Process Response
Use the response from the API to handle as required per your solution. For example:
* Redirect customer to thank you page if `chargeSuccess: true`
* Send the data to your internal system for additional processing and logic
### Step 6: Go Live Checklist
Test the integration using a production ProductId with the production endpoint (prod.paysight.io)
Verify the integration with your Paysight account manager to ensure everything is set up correctly
Wait for a GO LIVE message from your account manager before proceeding with live traffic
## Next Steps
Explore the complete API documentation
Learn about error handling and troubleshooting
Best practices for testing your integration
Always use the test environment `(test.paysight.io)` during development and testing phases.
## API Endpoint Overview
The card submission API processes payment transactions by accepting card details and customer information.
### Base URL
* **Test Environment**: `https://test.paysight.io`
### Endpoint
* **Method**: `POST`
* **Path**: `/api/{productId}`
## Step-by-Step Integration
### Step 1: Authentication Setup
The API uses [API key](https://app.paysight.io/settings/account) authentication passed in the Authorization header.
```bash theme={null}
'Authorization': 'your-api-key-here',
'ClientId': 'your-client-id',
'UserEmail': 'your-paysight-account-email',
'Content-Type': 'application/json'
```
### Step 2: Prepare Request Payload
The API expects a comprehensive payload with card, customer, and transaction details.
#### Minimum Required Request Body (JSON)
```json theme={null}
{
"paysightSession": null, // required if partnerSession is null
"partnerSession": "abcdefg12345", // required if paysightSession is null
"card": {
"name": "John Smith",
"pan": "4111111111111111",
"expiryMonth": 12,
"expiryYear": 2029,
"cvv": "333"
},
"email": "johnsmith@gmail.com",
"amount": 1.00
}
```
#### Session Management
| Parameter | Type | Description |
| :------------------ | :----- | :------------------------------------------------------------------------------------------------------------------------------- |
| **paysightSession** | string | Unique identifier of the session/user visit (generated by Paysight). |
| **partnerSession** | string | Partner/client assigned unique identifier of the session/user visit. Persist this value between calls for the same user session. |
#### Using session fields to match transaction webhooks
Use these two fields as your correlation keys across API calls and webhook events:
* Send your own click/visit/session identifier in `partnerSession` when calling Card Submit.
* Card Submit responses return both `partnerSession` and `paysightSession`.
* Transaction webhooks include both fields, so you can join webhook events back to your original traffic/session data.
* If you use the Widget SDK, `sessionId` is forwarded to Card Submit as `partnerSession`.
### Step 3: Make a Request to API
### Base URL
* **Test Environment**: `https://test.paysight.io`
### Endpoint
* **Method**: `POST`
* **Path**: `/api/{productId}`
### Step 4: Handle the Response
The API returns a comprehensive response with transaction details:
```json theme={null}
{
"paysightSession": "",
"partnerSession": "",
"subscribeSuccess": true,
"chargeSuccess": true,
"info": "",
"error": "",
"email": "",
"message": "",
"orderId": 123,
"descriptor": "",
"mid": "",
"threeDSecureId": "",
"transactionId": "",
"amount": 1.00
}
```
If chargeSuccess is false but subscribeSuccess is true, this indicates a successful opt-in.
### Step 5: Process Response
Use the response from the API to handle as required per your solution. For example:
* Redirect customer to thank you page if `chargeSuccess: true`
* Send the data to your internal system for additional processing and logic
### Step 6: Go Live Checklist
Test the integration using a production ProductId with the production endpoint (prod.paysight.io)
Verify the integration with your Paysight account manager to ensure everything is set up correctly
Wait for a GO LIVE message from your account manager before proceeding with live traffic
## Next Steps
Explore the complete API documentation
Learn about error handling and troubleshooting
Best practices for testing your integration