> ## Documentation Index
> Fetch the complete documentation index at: https://docs.paysight.io/llms.txt
> Use this file to discover all available pages before exploring further.
# Creating a Brand
> Step-by-step guide to set up a new brand in Paysight, including email and portal settings.
## Who is this for?
This guide will be for anyone setting up a new shop or business in Paysight. Follow these steps to add your brand details, configure email settings, and get your portal ready.
## Pre-requisites
You should have a Paysight account to login to the Paysight Dashboard and create a Brand.
Once you have a Paysight account, you should create at least one Company to control and identify parts of your business.
# Creating a Brand in Paysight Dashboard
You’ll see a form with several sections. Here’s what each field means and how to fill it out.
Go to **Management > Brand** in your Paysight Dashboard.
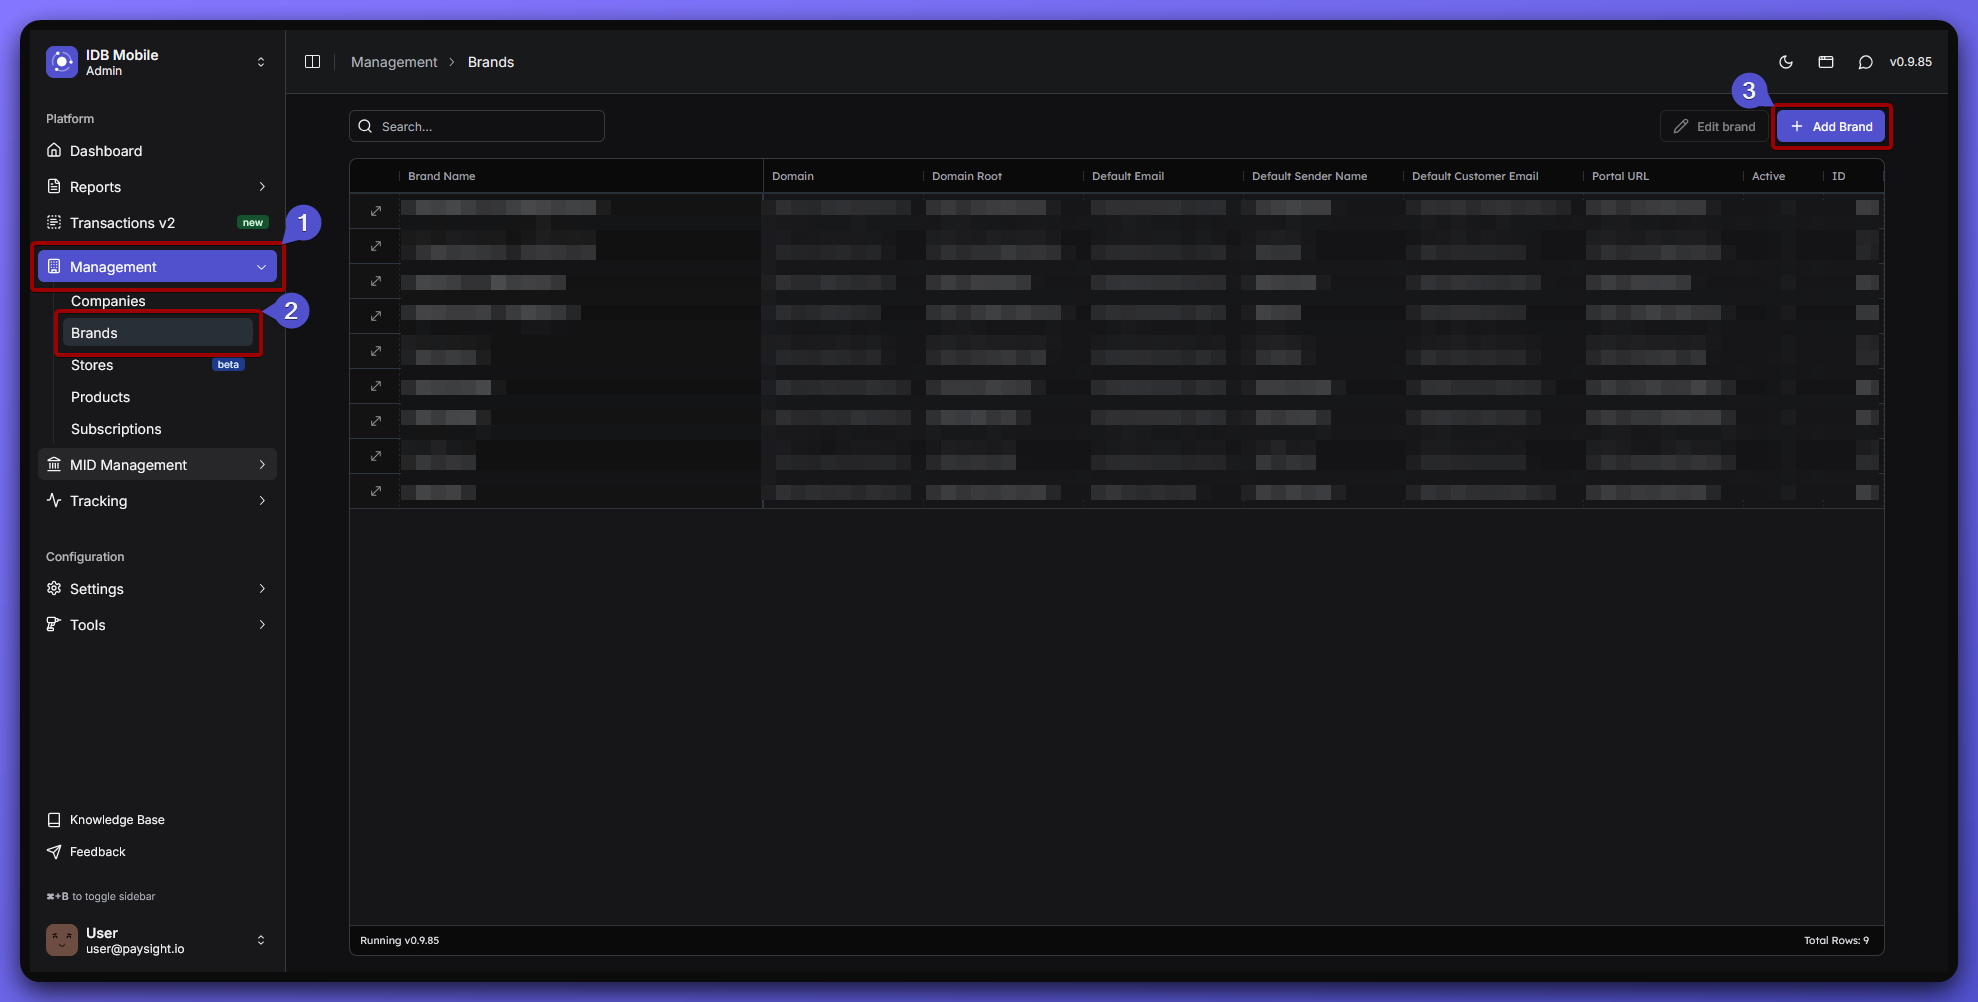 You’ll see a form with several sections to fill out. This includes your brand name, domain, email settings, and portal URL.
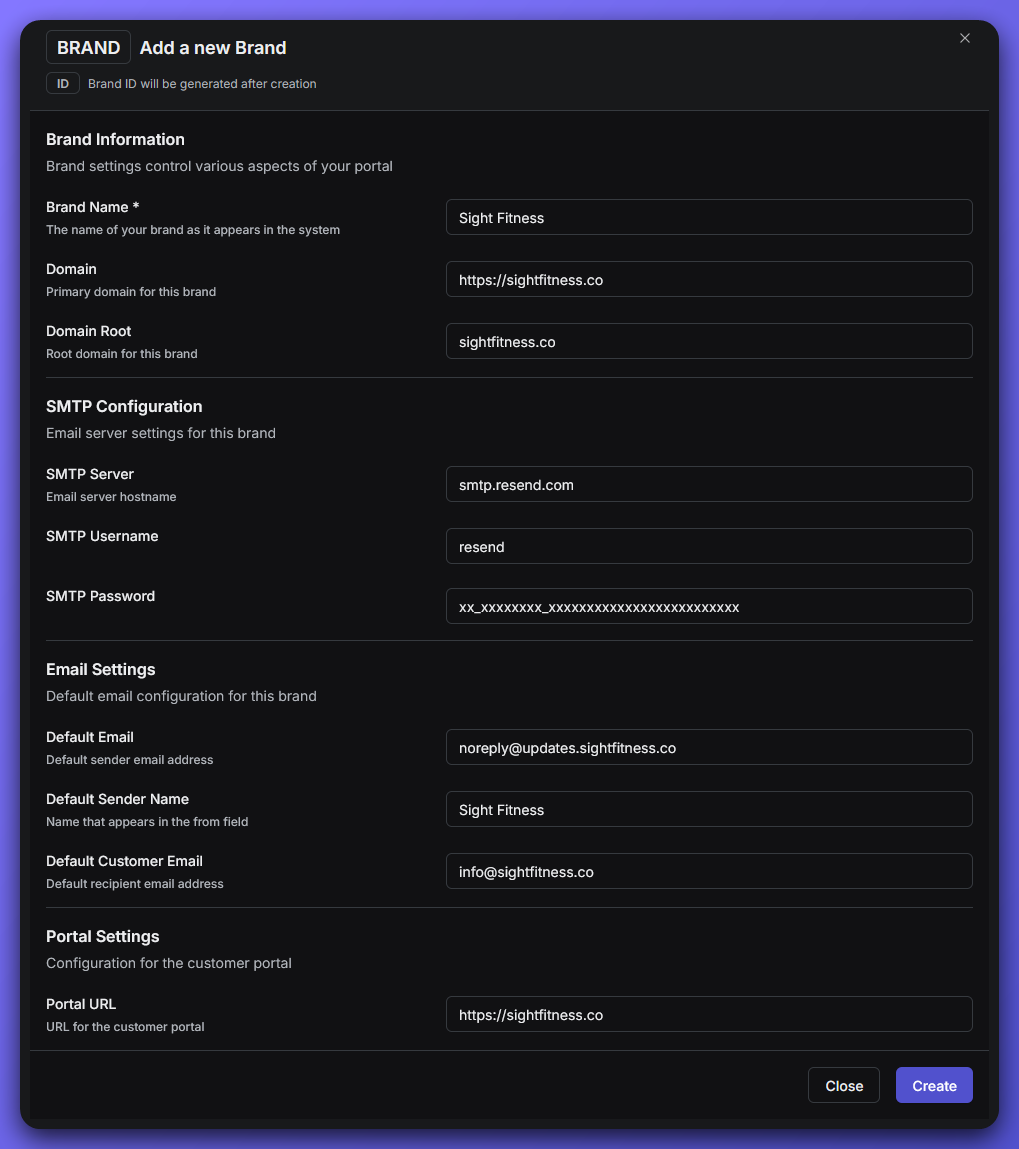 ### Basic Information
* **Brand Name**: The name of your shop or business.\
*Example: Sight Fitness*
* **Domain**: The full website address for your shop.\
*Example: [https://sightfitness.co](https://sightfitness.co)*
* **Domain Root**: Your shop’s domain without `https://` or `www.`\
*Example: sightfitness.co*
### SMTP Configuration
These fields control how Paysight sends emails for your brand. Defaults are provided, but you can use custom settings if needed.
* **SMTP Server**: The email server hostname.\
*Default: smtp.resend.com*
* **SMTP Username**: The username for the SMTP server.\
*Default: resend*
* **SMTP Password**: The password for the SMTP server.\
*Example: xx\_xxxxxxxx\_xxxxxxxxxxxxxxxxxxxxxxxx*
### Email Settings
* **Default Email**: The sender address for your shop’s emails.\
*Example: [noreply@updates.sightfitness.co](mailto:noreply@updates.sightfitness.co)*
* **Default Sender Name**: The name that appears as the sender—usually the same as your Brand Name.\
*Example: Sight Fitness*
* **Default Customer Email**: The main contact email for your customers. Use your support or info address.\
*Example: [info@sightfitness.co](mailto:info@sightfitness.co)*
### Portal Settings
* **Portal URL**: The main website address for your shop. This is usually the same as your Domain.\
*Example: [https://sightfitness.co](https://sightfitness.co)*
* Double-check all fields for accuracy.
* When you’re ready, click **Create Brand** to finalize your brand setup.
## What's Next?
If you have at least one MID Account set up, you can start creating a subscription. It is recommended to have a MID approved by your Account Manager and have tested successfully.
Merchant account lets your business take card payments online or in-store, and keeps those payments organized and secure
Subscription lets you get paid automatically and reliably, while giving your customers ongoing access to what you offer
If you’re not sure about any field, you can always ask your Paysight onboarding manager or check your shop’s website and support contacts.
### Basic Information
* **Brand Name**: The name of your shop or business.\
*Example: Sight Fitness*
* **Domain**: The full website address for your shop.\
*Example: [https://sightfitness.co](https://sightfitness.co)*
* **Domain Root**: Your shop’s domain without `https://` or `www.`\
*Example: sightfitness.co*
### SMTP Configuration
These fields control how Paysight sends emails for your brand. Defaults are provided, but you can use custom settings if needed.
* **SMTP Server**: The email server hostname.\
*Default: smtp.resend.com*
* **SMTP Username**: The username for the SMTP server.\
*Default: resend*
* **SMTP Password**: The password for the SMTP server.\
*Example: xx\_xxxxxxxx\_xxxxxxxxxxxxxxxxxxxxxxxx*
### Email Settings
* **Default Email**: The sender address for your shop’s emails.\
*Example: [noreply@updates.sightfitness.co](mailto:noreply@updates.sightfitness.co)*
* **Default Sender Name**: The name that appears as the sender—usually the same as your Brand Name.\
*Example: Sight Fitness*
* **Default Customer Email**: The main contact email for your customers. Use your support or info address.\
*Example: [info@sightfitness.co](mailto:info@sightfitness.co)*
### Portal Settings
* **Portal URL**: The main website address for your shop. This is usually the same as your Domain.\
*Example: [https://sightfitness.co](https://sightfitness.co)*
* Double-check all fields for accuracy.
* When you’re ready, click **Create Brand** to finalize your brand setup.
## What's Next?
If you have at least one MID Account set up, you can start creating a subscription. It is recommended to have a MID approved by your Account Manager and have tested successfully.
Merchant account lets your business take card payments online or in-store, and keeps those payments organized and secure
Subscription lets you get paid automatically and reliably, while giving your customers ongoing access to what you offer
If you’re not sure about any field, you can always ask your Paysight onboarding manager or check your shop’s website and support contacts.