> ## Documentation Index
> Fetch the complete documentation index at: https://docs.paysight.io/llms.txt
> Use this file to discover all available pages before exploring further.
# Creating a Subscription
> Step-by-step guide to set up a new subscription model in Paysight
## Who is this for?
This guide is for anyone setting up a new subscription for your brand in Paysight. Follow these steps to add your subscription details for your store.
## Pre-requisites
Create a Merchant ID (MID) Account to handle payments for your subscription.
Set up at least one Brand to associate your subscription with your business.
It is recommended to create MerchantID (MID) Account, Brand and Product before creating a subscription.
## Creating a Subscription
Go to **Management** > **Subscription** in your [Paysight Dashboard](https://app.paysight.io/).
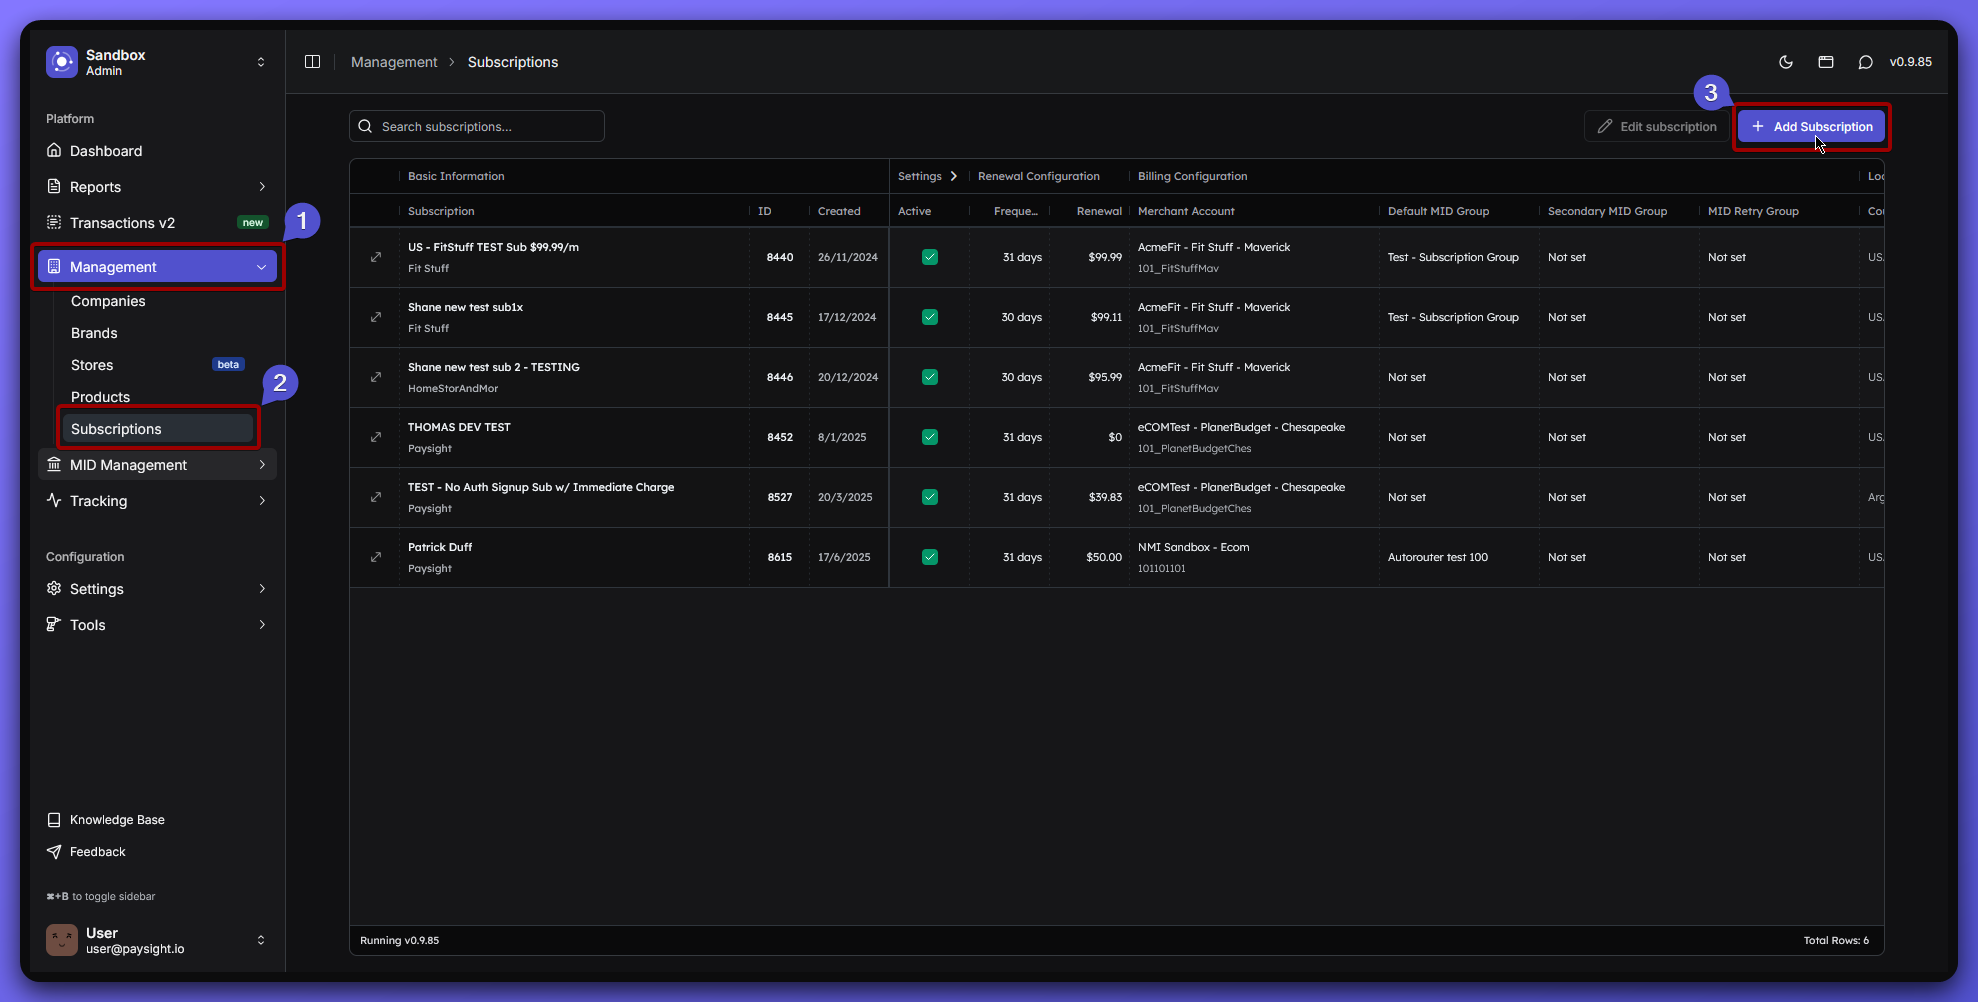 You'll see several sections to fill out for your subscription model.
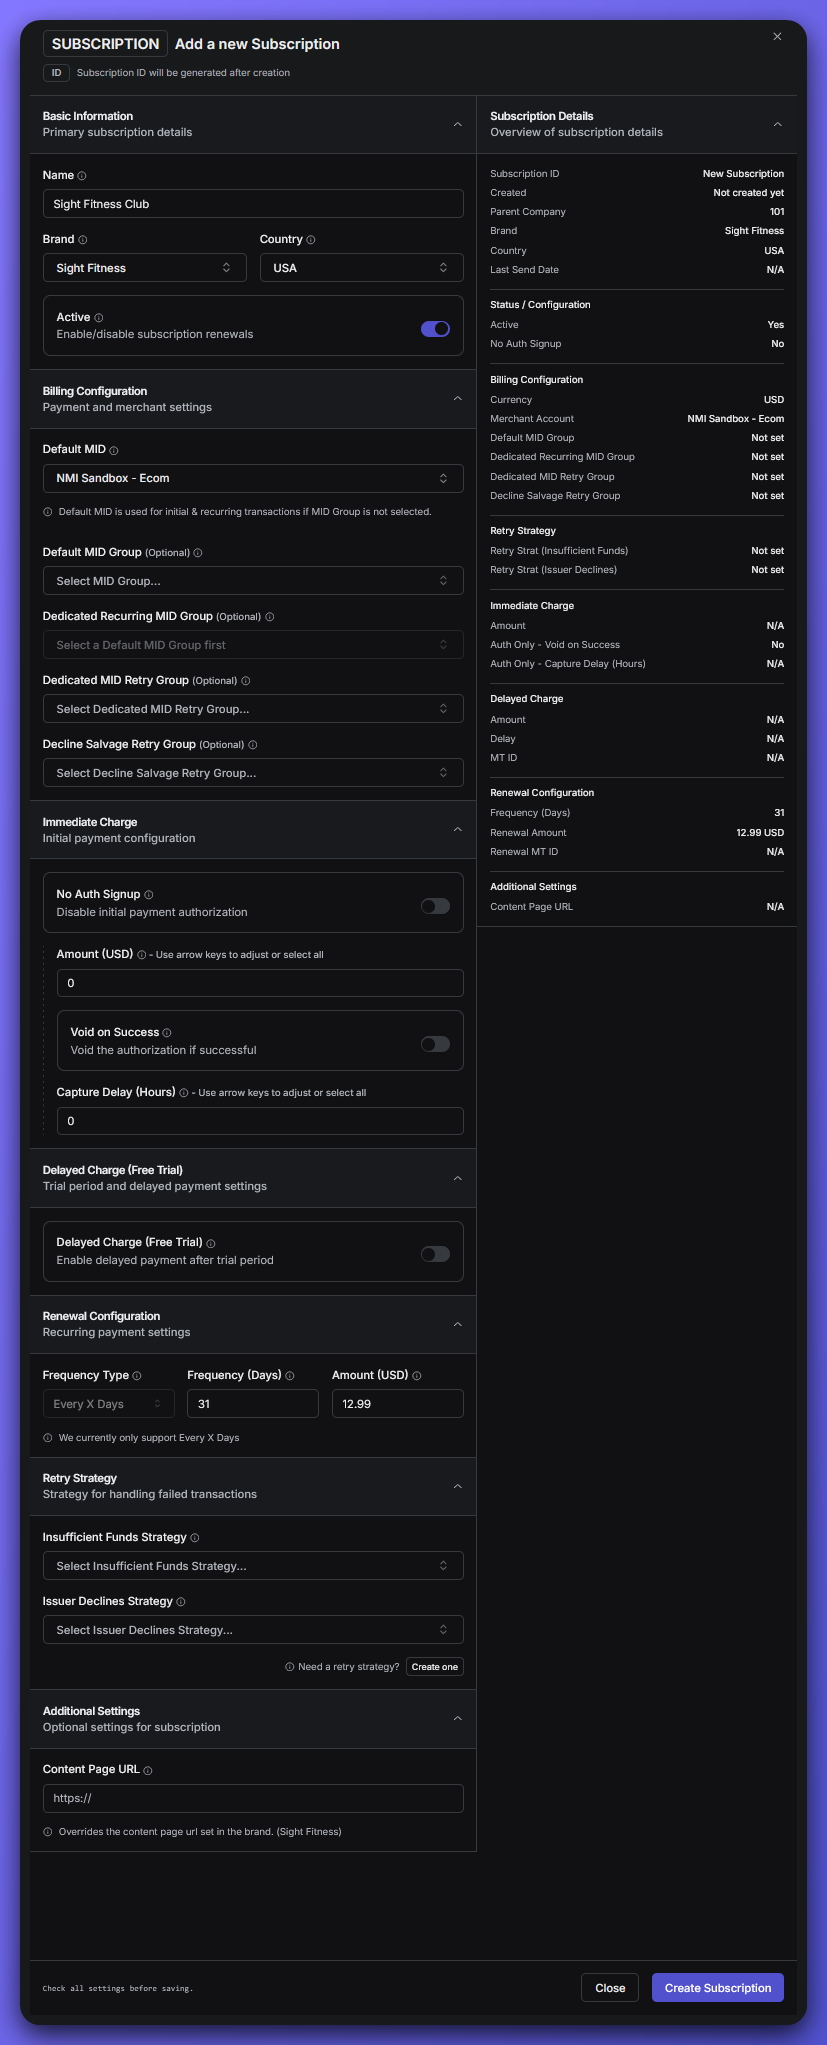 ### Basic Information
* **Name**: The name of your subscription plan.\
*Example: Sight Fitness Club*
* **Brand**: Select the brand this subscription belongs to.\
*Example: Sight Fitness*
* **Country**: The country where your shop operates (*or leave as All/Unassigned if not country-specific*).\
*Example: USA*
### Billing Configuration
This will determine which Merchant Account will be used for this subscription.
* **Default MID**: Select the Merchant Account that will handle payments for this subscription.\
*Example: NMI Sandbox - Ecom*
* ***Optional Fields***:
These can be configured based on your payment processor and business needs.
* ***Default MID Group***: If you have multiple Merchant Accounts, you can select a group to manage them together.
* ***Dedicated Recurring MID Group***: If you want to use a specific Merchant Account for recurring payments.
* ***Dedicated MID Retry Group***: If you want to use a specific Merchant Account for retrying failed payments.
* ***Decline Salvage Retry Group***: If your usual payment accounts aren’t available then a selected merchant account group would be selected to retry the payment.
Selection from this Merchant Account group does not adhere to any MID selection Rule sets
### Immediate Charge
*This is optional and can be skipped if you want to change the configuration later*.
Initial payment configuration for the subscription.
* **No Auth Signup**: If checked, this will skip the initial payment authorization.
* **Amount (USD)**: Set amount for the initial charge.
* **Void On Success**: If checked, it will immediately voids the authorization if the initial charge is successful.
* **Capture Delay (Hours)**: Set a delay for capturing the initial charge after authorization.
### Delayed Charge (Free Trial)
*This is optional and can be skipped if you want to change the configuration later*.
* If checked, this will allow a delayed charge for free trial periods. You can set the amount and duration of that delayed charge during trial period.\
*Example:*
* ***Amount**: 12.99*
* ***Delay**: 7 days*
### Renewal Configuration
Currently only support Every x Days
* **Frequency (Days)**: Set how often the subscription renews.\
*Example: 31 days* (Default amount)
* **Amount (USD)**: Charge amount for each renewal.
*Example: 12.99*
### Retry Strategy
*This is optional and can be skipped if you want to change the configuration later*.
If you have set Retry Strategies in your account, you can select them here. This will determine how payments will be handled if they fail. Here are the options:
* **Insufficient Funds Strategy**: Handles insufficient errors
* **Issuer Declines Strategy**: Handles issuer declines
### Additional Settings
*This is optional and can be skipped if you want to change the configuration later*
* **Content Page URL**: If a different URL is provided, this will override the content page url set in the brand.
* Double-check all fields for accuracy.
* When you’re ready, click **Create Subscription** to finalize your subscription setup.
## What's Next?
After creating the subscription model, you can start creating a product that will use this subscription.
A product is the main thing you sell or offer in Paysight, making it easy for customers to buy and for you to manage sales and subscriptions.
If you’re not sure about any field, you can always ask your Paysight onboarding manager or check with your merchant provider for correct details.
### Basic Information
* **Name**: The name of your subscription plan.\
*Example: Sight Fitness Club*
* **Brand**: Select the brand this subscription belongs to.\
*Example: Sight Fitness*
* **Country**: The country where your shop operates (*or leave as All/Unassigned if not country-specific*).\
*Example: USA*
### Billing Configuration
This will determine which Merchant Account will be used for this subscription.
* **Default MID**: Select the Merchant Account that will handle payments for this subscription.\
*Example: NMI Sandbox - Ecom*
* ***Optional Fields***:
These can be configured based on your payment processor and business needs.
* ***Default MID Group***: If you have multiple Merchant Accounts, you can select a group to manage them together.
* ***Dedicated Recurring MID Group***: If you want to use a specific Merchant Account for recurring payments.
* ***Dedicated MID Retry Group***: If you want to use a specific Merchant Account for retrying failed payments.
* ***Decline Salvage Retry Group***: If your usual payment accounts aren’t available then a selected merchant account group would be selected to retry the payment.
Selection from this Merchant Account group does not adhere to any MID selection Rule sets
### Immediate Charge
*This is optional and can be skipped if you want to change the configuration later*.
Initial payment configuration for the subscription.
* **No Auth Signup**: If checked, this will skip the initial payment authorization.
* **Amount (USD)**: Set amount for the initial charge.
* **Void On Success**: If checked, it will immediately voids the authorization if the initial charge is successful.
* **Capture Delay (Hours)**: Set a delay for capturing the initial charge after authorization.
### Delayed Charge (Free Trial)
*This is optional and can be skipped if you want to change the configuration later*.
* If checked, this will allow a delayed charge for free trial periods. You can set the amount and duration of that delayed charge during trial period.\
*Example:*
* ***Amount**: 12.99*
* ***Delay**: 7 days*
### Renewal Configuration
Currently only support Every x Days
* **Frequency (Days)**: Set how often the subscription renews.\
*Example: 31 days* (Default amount)
* **Amount (USD)**: Charge amount for each renewal.
*Example: 12.99*
### Retry Strategy
*This is optional and can be skipped if you want to change the configuration later*.
If you have set Retry Strategies in your account, you can select them here. This will determine how payments will be handled if they fail. Here are the options:
* **Insufficient Funds Strategy**: Handles insufficient errors
* **Issuer Declines Strategy**: Handles issuer declines
### Additional Settings
*This is optional and can be skipped if you want to change the configuration later*
* **Content Page URL**: If a different URL is provided, this will override the content page url set in the brand.
* Double-check all fields for accuracy.
* When you’re ready, click **Create Subscription** to finalize your subscription setup.
## What's Next?
After creating the subscription model, you can start creating a product that will use this subscription.
A product is the main thing you sell or offer in Paysight, making it easy for customers to buy and for you to manage sales and subscriptions.
If you’re not sure about any field, you can always ask your Paysight onboarding manager or check with your merchant provider for correct details.